How can you detect the Fake FB Profile. On these days we are getting so many friend request specially by girls, but there is no way to identify that account is fake or original. So don't worry we are going to tell you simple method to detect fake Facebook account.
So this is a Facebook account which named by Sarikha Agarwal. Now we need to verify this account real or fake, so our first step is going to the images.google.com and click on camera image.
So when you click on search by image you will get popup like below image.
Now go to that profile, right click on image and click on copy image URL
Now profile pic URL has copied.. now again go to images.google.com Tab and paste image URL
When you enter then you get related images search...
Now you can better see that this profile is real or fake..So here is a proof that this profile is fake. Enjoy the trick.
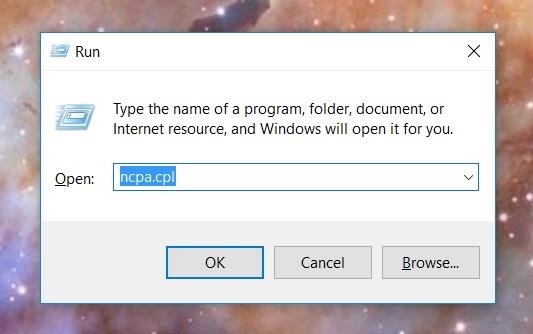
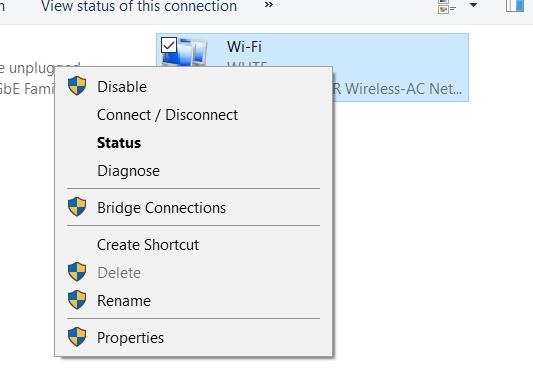
Go to your network adapter settings. (This can be done by accessing Network Connections through the Control Panel, by using the Run menu (pressing Win+R on your keyboard and typing in "ncpa.cpl"), or by simply typing in "ncpa.cpl" in the Start menu.)
Once the Network Connections window pops up, find your wireless network, right-click on it, and select "Status" from the menu.
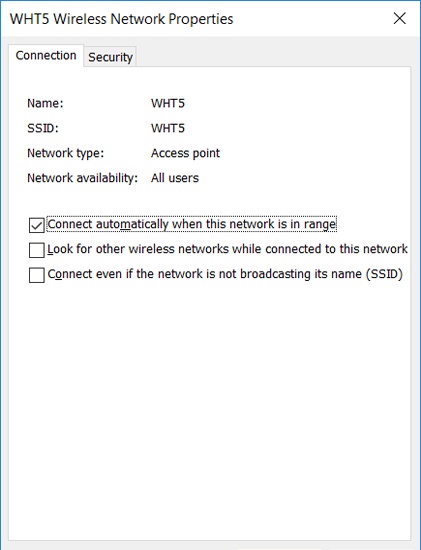
In the Wi-Fi Status window, tap on "Wireless Properties."
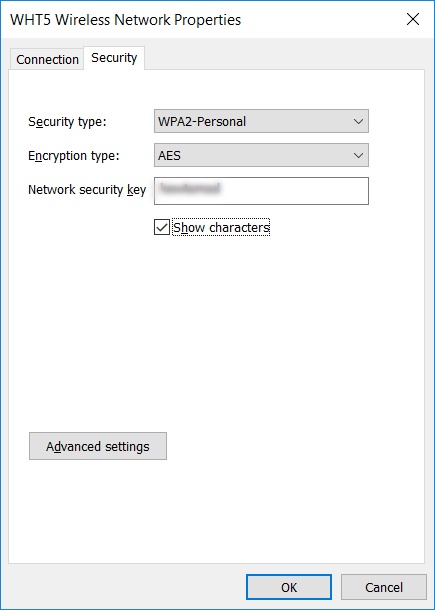
Go to the Security tab, and check the box next to "Show characters."
Your password will appear in the text box next to "Network security key."
And with the password in-hand, you can give it away to a friend or family member, use it on your other devices, or even just jot it down somewhere so you can quickly access it later without having to go through this process again
Check the time when your Computer / Laptop turned on or windows Up Time windows 7/8/10
Your Windows system’s up time is displayed in the Task Manager. Right-click the task bar and select Task Manager or press Ctrl+Shift+Escape to open it.
On Windows 8, click the Performance tab and look under “Up time” at the bottom of the window.
On Windows 7 or Vista, you’ll also find this information on then Performance tab — look for “Up time” under System.
Picasa is software that helps you instantly find, edit and share all the pictures on your PC. Every time you open Picasa, it automatically locates all your pictures (even ones you forgot you had) and sorts them into visual albums organized by date with folder names you will recognize. You can drag and drop to arrange your albums and make labels to create new groups. Picasa makes sure your pictures are always organized.
Picasa also makes advanced editing simple by putting one-click fixes and powerful effects at your fingertips. And Picasa makes it a snap to share your pictures, you can email, print photos home, make gift CDs, instantly share your images and albums, and even post pictures on your own blog.
The latest version includes Web Albums (along with other improvements), but requires that you request an account from Google.
Tango is a great messaging client and Skype alternative, which you can use to connect from your desktop to all of your friends who are using the Tango mobile app for iOS or Android.
Tango Key Features
With Tango you can send and receive free messages.
You can make free video and voice calls.
With the News Feed feature, you can now share all of the important things in your life, with all of your friends.
The social aspect of Tango allows you to search for friends of friends, just like you would with other social networking platforms.
You can also search for great entertainment, share music and play games with your Tango friends.
Nimbuzz! is a free call and messaging client available for PC, Mac, mobile phones and tablets. Nimbuzz to Nimbuzz conversations are free; land line, mobile and international numbers can be called at low rates. But Nimbuzz is more than making phone calls. You can instant message one-to-one with close friends or join chat rooms for multi-people conversations.
If you want to go even more public, Nimbuzz sends your messages to your Twitter profile. Adding new contacts is easy: Import them from your instant messaging accounts and social networks such as Google Talk, Yahoo, Windows Live and Facebook as well as SIP/VoIP providers.
LINE allows you to share photos, videos, voice messages, contacts and your location information easily with your friends. You can get the latest news and special coupons for popular artists, celebrities,brands and TV shows.
With LINE you can exchange free instant messages with friends whenever and wherever you like, with one-on-one messaging and group chats.
LINE is available on all popular smartphone devices:iPhone, Android, Windows Phone, Blackberry and even on your PC
AOMEI Partition Assistant Standard is a free disk partition management application. The application has many powerful features that allow you to completely control your hard disk and partition. AOMEI Partition Assistant embeds sector-level data protection technology, which allows you to accomplish more partitioning operations.
Speccy will give you detailed statistics on every piece of hardware in your computer. Including CPU, Motherboard, RAM, Graphics Cards, Hard Disks, Optical Drives, Audio support. Additionally Speccy adds the temperatures of your different components, so you can easily see if there's a problem!
Processor brand and model
Hard drive size and speed
Amount of memory (RAM)
Graphics card
Operating system
At first glance, Speccy may seem like an application for system administrators and power users. It certainly is, but Speccy can also help normal users, in everyday computing life
You’ve got an Android phone, which means you’re going to need a Google account to make sure you get the most out of it. If you don’t have one already, you can set one up on the phone itself — but the quickest way to do it is to use a laptop.
Once you’ve got your account read, turn on your phone and run through the setup process. If you’ve had an Android device before, you’ll be asked if you want to restore your new phone from a backup of your previous handset — complete with the apps you had on that device. If you want to start fresh, select Setup as new device.
You’ll be asked if you want to set a screen-lock for your phone, which you can either do now or later. If you’re afraid of someone grabbing your device and looking through your personal data, set up your screen-lock now.
Next, you’ll be asked to decide on a series of options: to back up your phone to your Google account; to use Google’s location services; to use nearby Wi-Fi signals to help with location accuracy; and to send diagnostic data on your phone to Google to help improve Android.
Check the boxes next to the statements you agree to, press Next and you’re finished.
Change these settings
Now that you’ve taken care of the basics, you’re going to want to change some of its default settings.
The first thing I like to do when I get a new smartphone is to disable Auto Brightness. By doing this, you can manually control your phone’s display brightness whenever you want. Sure, Auto Brightness can help save battery life, but I prefer to control the feature myself.
Brightness controls for most Android phones are accessible from theNotifications Shade, which you can access by swiping down from the top of any screen. You can also disable Auto Brightness by opening theAndroid Settings menu, navigating to Display and switching off the feature.
You can also disable things like your phone’s GPS and Bluetooth to help save battery life — though when you want to use them, you’ll have to switch them back on.
Download these apps
A smartphone without apps is just a phone. This would be my list of apps I’d download first to any new handset:
Naturally, if you’re a social media lover, you should download apps likeFacebook, Twitter, and Instagram.
If you love reading articles online, download Pocket, which lets you save articles from websites for offline reading, and displays them with white text against a black background, which saves on battery life.
Music listeners should get Spotify or Pandora, which let you stream your favorite songs while on the go.
If you live in a major city, you can download your area’s mass transit app to make getting around easier, as well as get up-to-date schedules.
I also like Seamless for ordering food, and Venmo for paying back friends quickly. And if you’re into sports, you can check out the ESPN app.
Suppose you have a music folder that contains all songs by your favorite singer. Would it not be great if instead of the plain white background, you could add the singer's image as the background of this folder?
It is relatively easy to add background images to folders using a simple desktop.ini trick just as easily as you can change your Desktop's background. Desktop.ini is a system file that is used to customize the appearance and behavior of folders in Windows. We can use this ability of desktop.ini files to add backgrounds to folders just by adding a few lines of code.
This is how the background in folder looks like.
Steps for adding backgrounds to Folders
Open Notepad.
Copy and paste the following code:-
[{BE098140-A513-11D0-A3A4-00C04FD706EC}] iconarea_image="location of the image"
You need to slightly modify this code on Windows Vista and Windows 7 as the ability to add folder backgrounds has been removed. So, if you use these versions of Windows, install AveFolderBG and then, replace [{BE098140-A513-11D0-A3A4-00C04FD706EC}] with [AveFolder] in the above code. To install this app, extract all the files and then, open the folder according to your installation of Windows (32 bit or 64 bit), right click install.bat and select Run as Administrator.
In this code, iconarea_image is the parameter where the location of your image will go.
Save the file as desktop.ini.
Place this file in the folder where you want your personalized background.
On Windows XP, you need to add system attribute to the folder where you want a background. To do this, open command prompt and execute "attrib +s D:\Music" (without quotes) if "D:\Music" is the location of your folder. If there are spaces in the location of your folder, you need to add double quotes around it. Windows Vista and 7 users need not add system attribute to folders.
You might need to log off and log back on for the changes to take effect. Sometimes, AveFolder app fails to work in which case, you will need to restart Windows Explorer. I recommend you to create a System Restore point in case you do not like the results.
You can hide this desktop.ini file if you feel that it is something that should not be visible in your folder.
Tip: I am using this trick to have a personal picture as the background of the root folder of my flash drive. So, whenever I connect it to my Windows PC, the picture is displayed as the background. You can also do this but you should have the image in the drive itself. As you cannot assign a static location to the icon area_image parameter (as the drive could be G:/ on one computer while F:/ on the other), you need to add the image's dynamic location. To do this, add "/{location of the image in flash drive}" as the value of iconarea_image. For example, if your image is located in the Pics folder in the flash drive, you need to have this value as:-
iconarea_image=/Pics/Image.jpg
It is important to note that the background to your flash drive will only be displayed on computers running Windows XP (if you have used the code for XP) or those computers running Windows 7 and Windows Vista that have AveFolder installed. Sadly, Windows 8 and Windows 8.1 do not support this trick. Also, there is no way to make the background of your flash drive visible on all computers unless you modify your flash drive to automatically install this app on every PC you plug it in.
If this trick does not work for you, do add a comment.
Have you ever left your PC in a hurry? Have you ever felt that it is a pain to lock your system in the simple way by doing CTRL+ALT+DEL? I would imagine that you have and then, this trick is for you. This trick enables you to create a shortcut to lock your computer instead of doing the regular CTRL+ALT+DEL, thus providing you a way to quickly and easily get away from your PC whenever you are in a hurry. To use this trick, follow the instructions given below:-
Steps
Right Click on an empty space on the Desktop, point to New and click on Shortcut.
In the dialog box that pops up, type the following code without quotes in the Type the location of the item.
rundll32 user32.dll,LockWorkStation
3. Click on Next and type a name for the shortcut in the Type a name for this Shortcut textbox. 4. Click on Finish.
Now you will be able to lock your computer by double clicking on the created shortcut. You can also add this shortcut to the Quick Launch toolbar to lock your system with only a single click
If your mouse is not working and you don't wish to wait till you get a new mouse, you would definitely like to know how you can use your keyboard as mouse. It is easy to use your mouse as keyboard in Windows using the On Screen Keyboard utility, but it is also possible to do the reverse.
All you need to do is:
Windows XP Users:-
Go to Control Panel.
Then click on Switch to Classic View.
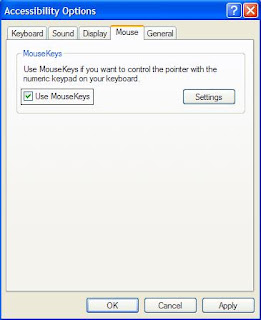
Then Click on Accessibility Options.
Then Click on the Mouse Tab.
Select Use MouseKeys.
Click on OK.
Then activate NumberLock (by pressing the NumLk key).
You should hear a beep sound.
Now you can control the mouse pointer using the arrow keys on the numeric keypad.
Windows 8, Windows 7 and Vista Users:
Open Ease of Access Center by clicking the Start button , clicking Control Panel, clicking Ease of Access, and then clicking Ease of Access Center.
Click Make the mouse easier to use.
Under Control the mouse with the keyboard, select the Turn on Mouse Keys check box.
You can also increase the acceleration and speed of your mouse movements according to your needs.
You can alternately press the Alt+Shift+Num Lock combination to instantly activate Mouse keys.
For laptops, this will only work if your keyboard has a numeric keypad or alternate keys which you can enable by pressing the Number Lock or the Function key.
On my laptop, number 6 key of the numeric keypad moves the mouse pointer left, number 4 key moves the mouse pointer right, number 2 key moves it down, number 8 key moves the mouse pointer up, number 5 and + key serve as right click while the number 0 key works as left click.
Convert FAT32 to NTFS Without Formatting or Losing Data
You have a flash drive or probably an external hard drive that currently has FAT32 file system and you want to change it to NTFS, because FAT32 does not support handling large files (over 4GB) or it is just simply old for your taste but there is just one problem, you don't want to lose your saved data. This article is for you then as it explains exactly how you can achieve seamless transition from FAT to NTFS without involving any data loss.
While it is generally recommended to use the NTFS file system because of its stability, security and lesser defragmentation time, most of us end up using FAT32 because that is what most disks are preformatted with. Unless, we notice the “Not enough disk space error” despite disk space being available, we don't bother to change the file system. Moreover, most of us don't change it because of the risk of losing important data and lack of time (read laziness). As Microsoft was aware of this scenario, they added a capability in the command prompt to overcome this by executing a simple command. There are many software that support this too but the Convert command is one of the easiest ways to do so. Follow the steps below to know how:-
Important: While this method works perfectly, I would still advise you to backup your data in case anything goes wrong.
FAT 32 to NTFS Conversion Steps
1) Go to Computer, and note the name of the drive whose file system you wish to convert. 2) Click on Start. 3) Type cmd in the search bar if you use Windows 7, Windows 8, Windows 8.1 or Windows Vista. If you use Windows XP, click on Run and then execute cmd. 4) Execute "chkdsk h: /f " (without quotes) where H is the letter of the drive to undergo conversion. This checks the drive for errors and fixes them automatically. 5) Execute "Convert H: /FS:NTFS" (without quotes). H is again the letter of the drive to be converted. 6) The command prompt will start the conversion process and after a few minutes, CMD will say that conversion was successful. 7) You can check it in the properties of the drive through right click<Properties.
This command can also be used to convert FAT16 disks and works on Windows 8, Windows 8.1,Windows 7, Windows XP and Windows Vista. I converted my flash drive's file system using these steps and it worked flawlessly. It is interesting to note that this method cannot be used to reconvert NTFS file system back to FAT32. To reconvert back to FAT32, you will need to format the entire drive which will definitely cause data loss
Convert, Resize and Cut videos with VLC Media Player
VLC, the free and open source media player is great at playing media of even the most obscure formats. However, that is not all it can do. It can be used to easily convert videos from one format to other. Converting videos with VLC media player is pretty fast and is in the league of most premium video converters in terms of quality. It can also be used to resize videos from one size to other for when you need to shrink videos to fit in your mobile devices. It can also serve as a quick video cutting tool.
Convert Videos with VLC Media Player
To convert videos with VLC media player, follow the steps given below:-
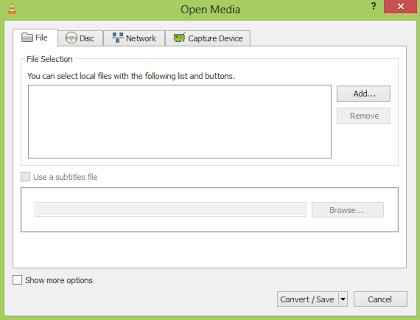
1) Open VLC media player. 2) Click on Media in the Menu bar. 3) In the dropdown menu, click on Convert/Save. Alternatively, you can press Ctrl+R to directly reach media options.
4) Click on the Add button on the right of the File selection box to load the video whose format you want to change. 5) In the following dialog box, click on browse to select the destination where your converted video will be.
6) In the profile selection option, select from a pre-configured profile of the output or customize it by clicking on the Settings icon on its right. You can select from a range of encapsulation, video and audio formats in the following dialog box if you wish to customize the output. 7) Click on Start to begin conversion. 8) VLC's progress bar will show progress. Do not close the player when it is converting videos as it will result in output video getting corrupted.
The speed with which VLC converts videos depends upon your computer's specifications. A faster computer converts faster while slower PCs take a lot of time. At the end of the conversion process, you will get the video in the format that you have selected in step 6.
Resize and shrink videos with VLC media player
Resizing the video involves making minor changes in the steps followed in conversion. While customizing the profile in step 6, go to the Video codec tab. Inside the Scale option, enter the desired width and height that you deem fit for your needs. After that, just convert the video as you normally would. This would result in the output video having the same dimensions that you specified. However, it is important to note that exact dimensions would only be achieved if the aspect ratio of the video is maintained. If the correct aspect ratio is not satisfied by your dimensions, VLC will take one of your dimension and change the other to satisfy it.
Cut videos with VLC media player
To crop videos with VLC media player, go to the menu bar and click on View menu. Inside it, check Advanced Controls. This will result in a few extra buttons over the normal toolbar. Play the video of your choice and press the record button (from the newly added buttons) at the point in the video from where you want to start. Then, again press this button when the video reaches the point at which you want to stop it. The cut video will automatically be saved in your Videos library. It is located at Libraries/Videos in Windows 8.1, Windows 8, Windows 7 and Windows Vista. In Windows XP, it is located at My Documents\My Videos. You can use the Frame by Frame button to get a high degree of accuracy. You need to install the newer versions of this program as older versions do not support this.
When you’re constantly on the move and rely on your laptop to perform when you most need it, you need to be sure that your battery won’t suddenly drain on you, leaving you in the lurch. If this sounds like a situation that you frequently find yourself in, perhaps you should look at upgrading to a laptop battery with a longer life. But if that step sounds a bit drastic, there may be a few things that you can do to prolong your battery’s power, when you don’t have access to a mains supply.
Turn down the brightness of your screen
Most modern laptops allow you to control the brightness of the screen. As you might expect, the brighter the screen, the more power is required. Dim the screen and you could find that your battery lasts a lot longer.
Shut down programs that aren’t being used
It’s often the case that you’ll have a number of programs running, yet you’re only using one or two of them. Although you might not see them running, they could be running in the background, adding to your CPU load, and consuming more energy. Shut down the programs not in use and save energy. If you’re unsure about programs running in the background, simply open the task manager.
Clean the battery contacts
You should clean the connection points on your laptop’s battery every now and then. Dampen a cloth with alcohol and use it to clean the points. Clean points mean that electric current can pass through efficiently, meaning you save on wasted power.
Use the CD/DVD drive sparingly
CD and DVD drives use a substantial amount of energy to operate. If possible, opt to use the hard drive instead, as this requires less energy.
Defragment your hard drive regularly
If you regularly defragment your hard drive, it will operate more efficiently. The more efficiently your hard drive operates, the less demand is placed on the battery, meaning you will get more life out of it! As an additional advantage, this will also help in speeding up your computer.
Do not use wireless networks
If you are not in need of a wireless connection, it is better to turn off the wireless receiver on your laptop as it puts unnecessary strain on your battery. Most laptops have an easy to locate switch to turn off wireless networks.
Disable unnecessary visual effects
Your computer requires computing power to show all those stunning visual effects. More computing means more battery consumed. Hence, if you want your battery to last longer, it is advisable to preferably turn off or at least tone down those visual effects.
Change Power scheme
Changing your power scheme to Power Saver makes your computer adjust its settings to use power minimally and give you extended battery life. Most operating systems allow you to change power schemes.
Regularly clean the air vents and keep your laptop cool
Your laptop will operate far more efficiently at lower temperatures. If your air vents are clogged up with dirt and dust, the machine cannot be cooled efficiently. By regularly checking that air can pass freely through the vents, you can be sure that your laptop remains as cool as possible. You can use a brush or a lightly dampened cloth to remove any dust or dirt. For even better cooling, you can try a laptop cooling pad.
Refrain from using external devices
External devices, such as external hard drives, iPods, and even your mouse can put unnecessary strain on your battery. If it isn’t absolutely crucial that you use these external devices, shut them down and disconnect them entirely to save on battery usage.
Only multitask when absolutely necessary
Performing multiple tasks at any one time, for example listening to music whilst downloading files and creating Word documents, will again put unnecessary strain on your computer. When battery power is scarce, don’t over-work your laptop and drain the battery too quickly